

Knowing the basics of Flutter is the most significant and commendable speculation you can do while learning Flutter. You ought to consistently know how the application lifecycle is created, rendered, updated, and destroyed as it will assist you with understanding your code!. Similarly, as with each structure out there, Flutter likewise has a lifecycle related to each application.
If you have developed apps for Android or iOS, you must have heard of app life cycle states. Like active, inactive, suspending, etc. Today we will discuss the app lifecycles in Flutter. In Flutter, we majorly discuss the lifecycle in two parts, the Lifecycle of Stateful Widgets and the Lifecycle of the app.
App Lifecycle in Flutter
The App Lifecycle notifies us of the application’s current state. There are 4 possible states of the Flutter application. The AppLifeCycle enum provides us the following options:
- detached: The application is still hosted on
FlutterEngine(TheFlutterEngineis the container through which Dart code can be run in an Android application). Here the engine is running without a view, it is either building a view or has no view to show. - inactive: The application is inactive and is not receiving user input. On iOS, this may mean that the app is in transition due to a phone call, touchID, etc. On Android, this means that either the app is on split-screen, a phone call, system dialog, etc.
- paused: The app is currently not visible to the user and is running in the background, it’s not receiving any user input.
- resumed: The app is visible to the user and is receiving user input.
Now, that we have basic knowledge of the App Lifecycle states let’s take a look at how to listen to these events.
Listening to App Lifecycle Events
By default we can’t listen to the App Lifecycle events we need to use WidgetsBindingObserver class. We can do it in Stateful widgets like this:
class MyApp extends StatefulWidget {
  MyApp({Key? key}) : super(key: key);


  @override
  _MyAppState createState() => _MyAppState();
}

class _MyAppState extends State<MyApp> with WidgetsBindingObserver {
...}
We can do the same using Stateless widgets:
class MyApp extends StatelessWidget with WidgetsBindingObserver{...}At this point also we would not be receiving any App Lifecycle events, we need to add the current class (this) as an observer to the WidgetsBinding instance. Note that we have to manually remove the observer too. The code for the Stateful widget would look like this:
  @override
  void initState() {
    super.initState();
    WidgetsBinding.instance!.addObserver(this);
  }

  @override
  void dispose() {
    WidgetsBinding.instance!.removeObserver(this);
    super.dispose();
  }
In Stateful widgets the initState and dispose are the perfect place to add and remove the observer. Here, addObserver adds the current context to the observer’s list and the removeObserver removes the current context from the observer’s list.
To do the same in Stateless widgets we will have to find a workaround. We can add the observer in the constructor and remove the observer when the back button is pressed. This solution does not handle all the possible cases, if you have a better solution please let me know. The code for adding and removing observers in the Stateless widget will be:
import 'package:flutter/material.dart';

class HomePage extends StatelessWidget with WidgetsBindingObserver {
  HomePage({Key? key}) : super(key: key) {
    WidgetsBinding.instance!.addObserver(this);
  }


  @override
  Widget build(BuildContext context) {
    return WillPopScope(
      onWillPop: () async {
        WidgetsBinding.instance!.removeObserver(this);
        return true;
      },
      child: Scaffold(),
    );
  }
}
Now both Stateful and Stateless widgets are capable of listening to the lifecycle events. We can now simply override the didChangeAppLifecycleState method.
  @override
  void didChangeAppLifecycleState(AppLifecycleState state) {
    if (state == AppLifecycleState.resumed) {
      print("Resumed");
    }
    if (state == AppLifecycleState.detached) {
      print("Detached");
    }
    if (state == AppLifecycleState.inactive) {
      print("Inactive");
    }
    if (state == AppLifecycleState.paused) {
      print("Paused");
    }
  }
So like this, we can easily listen to app events and get updated on app-level updates. Now you can get notified when your app moves into the background, get detached, or comes back to the foreground. Now let’s look at the lifecycle of the stateful widget.
LifeCycle of Stateful Widget in Flutter
In the Flutter application, every element is a widget thus the state lifecycle depends upon the type of widget you use. In Flutter majorly there are 2 types of widgets:
Stateless Widget
Stateless Widgets are those widgets that don’t change state at runtime it has an immutable state. These widgets are permanent and do not change their state once build. These are widgets that do not need to change their state at any point in time. eg: button, listItem, etc.
import 'package:flutter/material.dart';

class HomePage extends StatelessWidget {
  @override
  Widget build(BuildContext context) {
    return Container();
  }
}
Stateful Widget
Stateful Widgets are those widgets that can change their state at runtime, i.e it has a mutable state. These widgets are non-permanent thus their states change when their properties are modified. Here, to update the state use the setState((){}) function.
import 'package:flutter/material.dart';

void main() => runApp(MyApp());

class HomePage extends StatefulWidget {
  @override
  _HomePageState createState() => _HomePageState();
}

class _HomePageState extends State<HomePage> {
  @override
  Widget build(BuildContext context) {
    return Container();
  }
}
In the Stateful Widget, we are provided with the lifecycle methods. So we will now focus on Stateful widgets as they deal with the state. Let’s take a look at the methods provided.
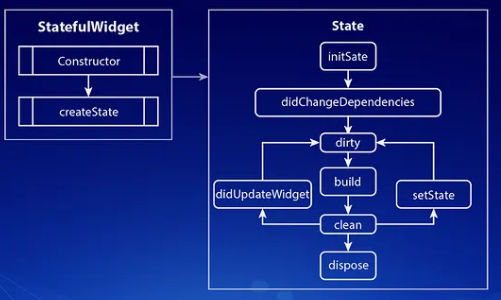
Stages Of App Lifecycle:
The life cycle depends on the state and how it changes. A stateful widget has a state so we can clarify the life cycle of flutter dependent on it. Stage of the life cycle:
- createState()
- initState()
- didChangeDependencies()
- build()
- didUpdateWidget()
- setState()
- deactivate()
- dispose()
Let deeply explain on Stage of the life cycle:
> createState()
This method is called when we create another Stateful Widget. It is an obligatory strategy. The createState() returns a case of a State-related with it.
class HomeScreen extends StatefulWidget {

  HomeScreen({Key key}) : super(key: key);

  @override
  HomeScreenState<StatefulWidget> createState() => HomeScreen();
}
> initState()
This is the strategy that is considered when the Widget is made interestingly and it is called precisely once for each State object. If we characterize or add some code in the initState() method this code will execute first even before the widgets are being built.
This method needs to call super.initState() which essentially calls the initState of the parent widget (Stateful widget). Here you can initialize your variables, objects, streams, AnimationController, and so on.
@override
void initState(){
  super.initState();
}
> didChangeDependencies()
This method is called following the initState() method whenever the widget initially is constructed. You can incorporate not many functionalities like API calls dependent on parent data changes, variable re-initializations, and so forth.
@override
void didChangeDependencies() {

}
> build()
This strategy is the main method as the rendering of all the widgets relies upon it. It is called each time when we need to render the UI Widgets on the screen.
At whatever point you need to update your UI or on the other hand on the off chance that you click hot-reload, the Flutter structure modifies the build() strategy!. Assuming you need to expressly revamp the UI if any information is transformed, you can utilize setState() which teaches the framework to again run the form method!
@override
Widget build(BuildContext context) {
  return Scaffold()
}
> didUpdateWidget()
This strategy is utilized when there is some adjustment of the configuration by the Parent widget. It is essentially called each time we hot reload the application for survey the updates made to the widget
If the parent widget changes its properties or designs, and the parent needs to modify the child widget, with a similar Runtime Type, then, at that point, didUpdateWidget is triggered. This withdraws to the old widget and buys into the arrangement changes of the new widget!.
@protected
void didUpdateWidget(Home oldWidget) {
  super.didUpdateWidget(oldWidget);
}
> setState()
The setState() method illuminates the framework that the internal state of this item has changed in a manner that may affect the UI which makes the structure plan a build for this State of the object.
It is an error to call this method after the system calls dispose(). This inside state could conceivably influence the UI apparent to the user and subsequently, it becomes important to rebuild the UI.
void function(){
  setState(() {});
}
> deactivate()
This method is considered when the State is removed out from the tree, however, this strategy can be additionally be re-embedded into the tree in another part.
This strategy is considered when the widget is as of now not joined to the Widget Tree yet it very well may be appended in a later stage. The best illustration of this is the point at which you use Navigator. push to move to the following screen, deactivate is called because the client can move back to the past screen and the widget will again be added to the tree!.
@override
void deactivate(){
  super.deactivate();
}
> dispose()
This strategy is essentially something contrary to the initState() method and is likewise important. It is considered when the object and its State should be eliminated from the Widget Tree forever and won’t ever assemble again.
Here you can unsubscribe streams, cancel timers, dispose animations controllers, close documents, and so on. At the end of the day, you can deliver every one of the assets in this strategy. Presently, later on, if the Widget is again added to Widget Tree, the whole lifecycle will again be followed!.
@override
void dispose(){
  super.dispose();
}
In this post, I have elaborately explained the two types of lifecycles in Flutter. We looked at App Lifecycle and Stateful Widget lifecycle. I hope now you can override all these functions with a concrete foundation of these functions.