

Riverpod Tutorials 2026 – Beginner Guide (Complete Implementation)
Flutter’s ecosystem has matured significantly, and state management remains one of the most debated topics among developers. From setState to Provider, BLoC, GetX, MobX, and Redux — each solution has its own philosophy.
But in 2026, Riverpod has positioned itself as one of the most reliable, scalable, and testable state management solutions for Flutter.
If you are searching for a complete and practical Riverpod tutorial for beginners, this guide will walk you through:
- What Riverpod is
- Why Riverpod is better than traditional Provider
- How to install Riverpod
- Understanding providers (Provider, StateProvider, FutureProvider, etc.)
- Real-world examples
- Practical project implementation
- Best practices
What is Riverpod?
Riverpod is a modern state management library for Flutter created by Remi Rousselet (creator of Provider). It solves many architectural and testing limitations of Provider.
Key Advantages of Riverpod
- Compile-time safety
- No dependency on BuildContext
- Improved testability
- Better performance
- Scalability for large applications
Riverpod removes common Provider problems such as:
- Provider not found exceptions
- Improper context usage
- Rebuild performance issues
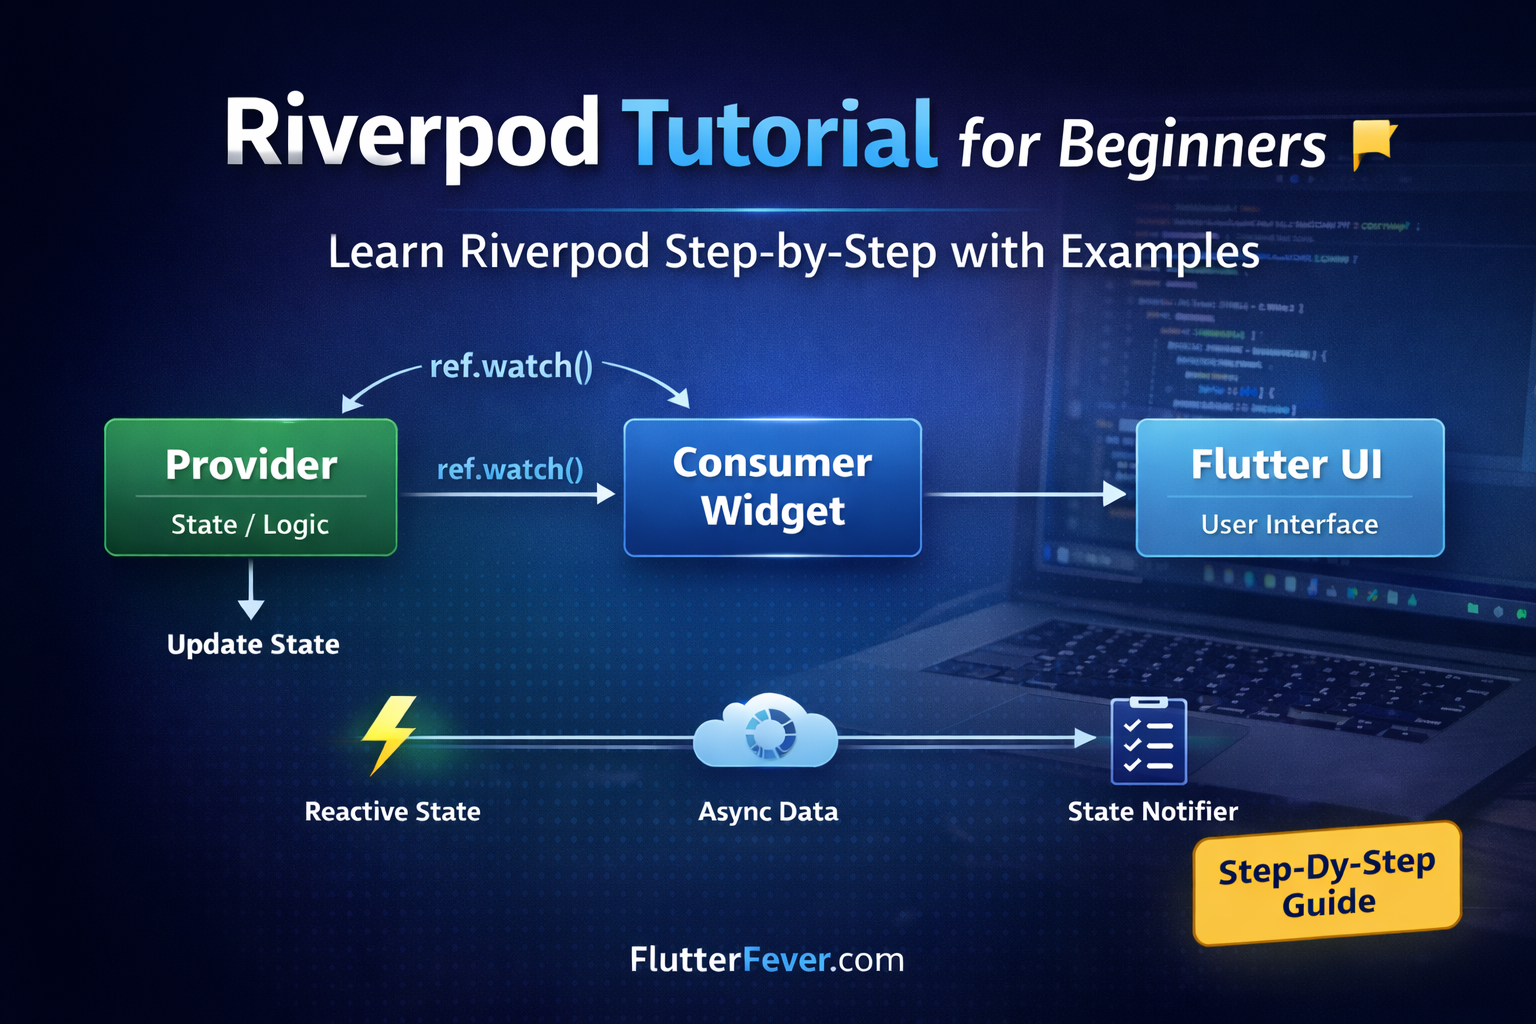
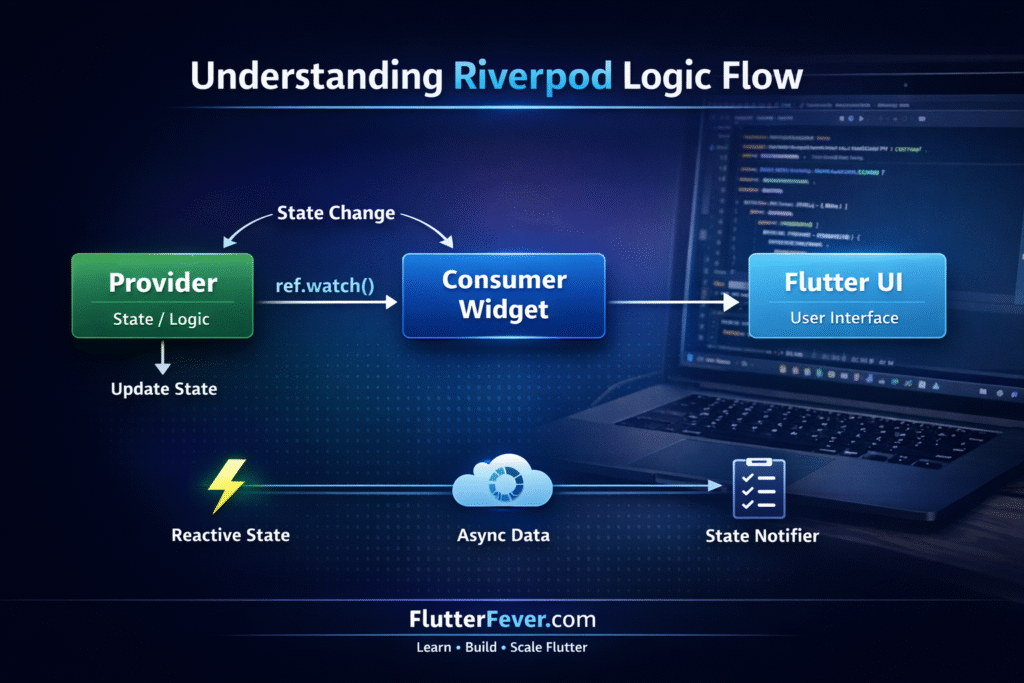
Core Riverpod Architecture Flow
                ┌────────────────────┐
                │   ProviderScope    │
                │ (App Root Wrapper) │
                └─────────┬──────────┘
                          │
                          ▼
                ┌────────────────────┐
                │     Provider       │
                │ (State / Logic)    │
                └─────────┬──────────┘
                          │
              ref.watch() │
                          ▼
                ┌────────────────────┐
                │   ConsumerWidget   │
                │   (UI Layer)       │
                └─────────┬──────────┘
                          │
                          ▼
                ┌────────────────────┐
                │   Flutter UI       │
                │   Rebuild Trigger  │
                └────────────────────┘
Why Use Riverpod in 2026?
Flutter apps today require:
- Clean architecture
- Separation of concerns
- Testable business logic
- Dependency injection
- Async data handling
Riverpod supports all of these out of the box.
If you are building:
- Fintech apps
- E-commerce apps
- SaaS dashboards
- Agritech apps
- Enterprise applications
Riverpod is production-ready.
Step 1: Install Riverpod in Flutter Project
Add dependency in pubspec.yaml:
dependencies:
  flutter_riverpod: ^2.5.0
Run:
flutter pub get
Read : Riverpod Package in Flutter – Features & Use Cases (2026 Guide)
Step 2: Wrap App with ProviderScope
Riverpod requires ProviderScope at root.
void main() {
  runApp(
    const ProviderScope(
      child: MyApp(),
    ),
  );
}
This enables Riverpod globally.
Understanding Core Concepts of Riverpod
Before coding examples, understand key terminology:
1. Provider
Basic read-only dependency.
2. StateProvider
Simple state management for primitive values.
3. FutureProvider
Handles async operations like API calls.
4. StateNotifierProvider
Used for complex state logic.
5. ConsumerWidget
Widget that listens to providers.
Example 1: Basic Provider Example
Let’s create a simple provider.
final messageProvider = Provider<String>((ref) {
  return "Welcome to Riverpod Tutorial 2026";
});
Using it:
class HomePage extends ConsumerWidget {
  @override
  Widget build(BuildContext context, WidgetRef ref) {
    final message = ref.watch(messageProvider);    return Scaffold(
      body: Center(
        child: Text(message),
      ),
    );
  }
}
Explanation
ref.watch()listens to provider.- If provider updates, widget rebuilds.
Example 2: StateProvider (Counter App)
Create counter provider:
final counterProvider = StateProvider<int>((ref) => 0);
Use it:
class CounterPage extends ConsumerWidget {
  @override
  Widget build(BuildContext context, WidgetRef ref) {
    final counter = ref.watch(counterProvider);    return Scaffold(
      appBar: AppBar(title: const Text("Riverpod Counter")),
      body: Center(
        child: Text(
          counter.toString(),
          style: const TextStyle(fontSize: 30),
        ),
      ),
      floatingActionButton: FloatingActionButton(
        onPressed: () {
          ref.read(counterProvider.notifier).state++;
        },
        child: const Icon(Icons.add),
      ),
    );
  }
}
Why This Is Better Than setState?
- Logic separated from UI
- Easy to test
- Scalable for large apps
Example 3: FutureProvider (API Call Example)
Simulating API call:
final userProvider = FutureProvider<String>((ref) async {
  await Future.delayed(const Duration(seconds: 2));
  return "Flutter Developer 2026";
});
Using it:
class FutureExample extends ConsumerWidget {
  @override
  Widget build(BuildContext context, WidgetRef ref) {
    final userAsync = ref.watch(userProvider);    return Scaffold(
      body: userAsync.when(
        data: (data) => Text(data),
        loading: () => const CircularProgressIndicator(),
        error: (error, stack) => Text("Error: $error"),
      ),
    );
  }
}
What Is Happening?
Riverpod automatically handles:
- Loading state
- Error state
- Success state
This makes async handling very clean.
Real-World Mini Project: Simple Todo App with Riverpod
Now let’s build a practical implementation.
Step 1: Create Model
class Todo {
  final String title;
  final bool completed;  Todo({required this.title, this.completed = false});  Todo copyWith({String? title, bool? completed}) {
    return Todo(
      title: title ?? this.title,
      completed: completed ?? this.completed,
    );
  }
}
Step 2: Create StateNotifier
class TodoNotifier extends StateNotifier<List<Todo>> {
  TodoNotifier() : super([]);  void addTodo(String title) {
    state = [...state, Todo(title: title)];
  }  void toggle(int index) {
    state[index] = state[index]
        .copyWith(completed: !state[index].completed);
    state = [...state];
  }
}
Step 3: Create Provider
final todoProvider =
    StateNotifierProvider<TodoNotifier, List<Todo>>(
        (ref) => TodoNotifier());
Step 4: Build UI
class TodoPage extends ConsumerWidget {
  final TextEditingController controller =
      TextEditingController();  @override
  Widget build(BuildContext context, WidgetRef ref) {
    final todos = ref.watch(todoProvider);    return Scaffold(
      appBar: AppBar(title: const Text("Riverpod Todo")),
      body: Column(
        children: [
          TextField(
            controller: controller,
            decoration:
                const InputDecoration(labelText: "Add Todo"),
          ),
          ElevatedButton(
            onPressed: () {
              ref
                  .read(todoProvider.notifier)
                  .addTodo(controller.text);
              controller.clear();
            },
            child: const Text("Add"),
          ),
          Expanded(
            child: ListView.builder(
              itemCount: todos.length,
              itemBuilder: (context, index) {
                return ListTile(
                  title: Text(todos[index].title),
                  trailing: Checkbox(
                    value: todos[index].completed,
                    onChanged: (_) {
                      ref
                          .read(todoProvider.notifier)
                          .toggle(index);
                    },
                  ),
                );
              },
            ),
          ),
        ],
      ),
    );
  }
}
Best Practices for Riverpod in 2026
- Separate providers into dedicated files
- Use code generation (
riverpod_generator) for large apps - Avoid business logic inside widgets
- Use
ref.read()only for actions - Use
ref.watch()for UI updates
Common Mistakes Beginners Make
- Forgetting ProviderScope
- Mixing Provider and Riverpod incorrectly
- Using ref.read instead of ref.watch
- Writing too much logic inside UI
When to Move Beyond Beginner Level?
You are ready for Intermediate Riverpod when:
- You understand StateNotifier
- You can build async apps
- You want dependency injection
- You want clean architecture
Read Articles : Riverpod vs Provider in Flutter – Which State Management is Better in 2026?
Conclusion
This Riverpod tutorial for beginners covered:
- What Riverpod is
- Installation
- Core providers
- Counter example
- API example
- Todo mini project
In Part 2 (Intermediate Riverpod Tutorial ), we will cover:
- Riverpod with Clean Architecture
- Dependency injection
- Repository pattern
- Advanced async handling
- Testing
Stay tuned on FlutterFever.com for the next tutorial in the Riverpod Tutorials 2026 series.
Frequently Asked Questions (Beginner Level – Riverpod Tutorial 2026)
Riverpod is a modern state management solution for Flutter that helps developers manage application state in a clean, scalable, and testable way. It is an improved and more powerful version of Provider.
Unlike traditional Provider, Riverpod:
Does not depend on BuildContext
Offers compile-time safety
Makes dependency injection easier
Improves testing
In simple words, Riverpod helps separate business logic from UI in Flutter applications.
Yes, Riverpod is generally better than Provider even for beginners because:
It prevents common mistakes like “Provider not found” errors
It does not require BuildContext
It makes state easier to manage
It is more scalable for large projects
Although Provider is simpler for very small apps, Riverpod is recommended for modern Flutter development in 2026.
This is one of the most common beginner questions.
ref.watch()
Listens to provider changes
Rebuilds UI when state updates
Used inside build method
ref.read()
Reads provider value once
Does not rebuild UI
Used for triggering actions (like button press)
Example:
final counter = ref.watch(counterProvider); // Rebuilds
ref.read(counterProvider.notifier).state++; // Updates state
Understanding this difference is very important in Riverpod basics.