

How to Enable Virtualization for Android Emulator (VT-x Fix) in 2026
If your Android Emulator is running painfully slow, refusing to start, or showing virtualization-related errors, the root cause is usually simple: hardware virtualization is disabled, unavailable, or blocked by Windows or BIOS settings. In 2026, Android Emulator performance still depends heavily on processor virtualization support and the correct hypervisor setup. Google’s current Android documentation says emulator VM acceleration uses your computer’s processor and hypervisor support to significantly improve execution speed, and on Windows it recommends Windows Hypervisor Platform (WHPX) as the preferred option.
This issue is commonly described as a VT-x fix, but in practice the problem is broader than Intel VT-x alone. Depending on your CPU, you may be dealing with Intel VT-x, AMD-V / SVM, BIOS-disabled virtualization, missing Windows hypervisor features, unsupported emulator system images, or conflicts with other virtualization software. Microsoft’s Hyper-V documentation also notes that Windows virtualization features depend on a 64-bit processor, SLAT, VM Monitor Mode extensions, sufficient RAM, and virtualization support enabled in BIOS/UEFI.
This guide is written for developers, students, and beginners who want a clear, easy-to-understand, complete solution. Instead of giving only one command or one checkbox to click, this article explains how virtualization works for the Android Emulator, how to confirm whether your machine supports it, how to enable it properly, and how to fix the most common errors step by step. Everything here is aligned with current official Android and Microsoft guidance.
Why virtualization is required for Android Emulator
Android Emulator can use hardware acceleration in two major ways: graphics acceleration for screen rendering and VM acceleration for faster execution. Google explains that VM acceleration uses your processor through a hypervisor and the processor’s virtualization extensions, which is why the emulator becomes much faster when virtualization is correctly enabled. Without that support, the emulator may still open in some cases, but it will often be extremely slow, unstable, or unable to use accelerated system images properly.
Google also states that supported processors for VM acceleration include Intel processors with Intel Virtualization Technology (VT-x) and AMD processors with AMD-V (SVM). On Windows, Android currently recommends Windows Hypervisor Platform (WHPX), and notes that the older Android Emulator Hypervisor Driver (AEHD) is being sunset on December 31, 2026, with Windows users expected to transition to WHPX. That makes WHPX the most future-proof path for most Windows developers right now.
Read : How do I launch the Android emulator from the command line in 2026?
Common VT-x or virtualization errors you may see
When virtualization is not configured correctly, the error message may vary. Sometimes Android Studio complains about VT-x not being available. Sometimes the emulator starts and closes immediately. Sometimes the emulator reports that acceleration is not supported. In older or alternate setups using the Android Emulator hypervisor driver, Google notes that a stopped driver with the specific Windows exit code shown in its docs can mean either virtualization extension is not enabled in BIOS or Hyper-V is not disabled for that AEHD-based setup.
The important thing to understand is this: the visible error may change, but the fix usually comes down to five checks:
- your CPU must support virtualization,
- virtualization must be enabled in BIOS/UEFI,
- Windows hypervisor support must be configured correctly,
- your emulator image must support acceleration,
- no conflicting virtualization setup should block the emulator.
What exactly is VT-x?
VT-x is Intel’s processor virtualization technology. For AMD systems, the equivalent is generally referred to as AMD-V or SVM. Intel’s own support guidance says VT-x must be supported by the processor, enabled in the BIOS, and used with an operating system and virtualization stack that support it. Microsoft’s system requirements also confirm that hardware-assisted virtualization must be turned on in BIOS or UEFI and may appear as Intel VT or AMD-V depending on your platform.
That is why simply owning a modern laptop is not always enough. A processor may support virtualization on paper, but it can still remain unavailable if BIOS settings disable it, if the laptop vendor hides the feature, or if Windows virtualization components are not configured properly. Intel explicitly notes that processor support alone does not complete the setup; BIOS and OS support matter too.
Before fixing the problem, check whether your PC supports virtualization
The first step is not changing random settings. The first step is confirming that your system actually meets the requirements. Microsoft says Hyper-V-related virtualization on Windows requires a 64-bit processor, SLAT, VM Monitor Mode extensions, at least 4 GB RAM, and virtualization enabled in BIOS/UEFI. It also recommends using systeminfo.exe to review the Hyper-V requirements section and see whether the required capabilities are present.
If you are on an Intel CPU, Intel advises checking the processor specification page to confirm support for Intel VT-x, then checking that VT-x is enabled in BIOS. If you are on AMD, Android’s emulator guidance says WHPX support on AMD requires virtualization or SVM to be enabled in BIOS, and recommends AMD Ryzen processors for that Windows path.
Step 1: Enable virtualization in BIOS or UEFI
This is the most important fix.
If BIOS or UEFI virtualization is disabled, Android Emulator acceleration will not work correctly no matter what you do inside Android Studio. Microsoft’s Windows virtualization requirements say hardware-assisted virtualization must be turned on in BIOS or UEFI, and Intel’s support article says VT-x must be enabled in BIOS for Intel systems.
On most computers, the BIOS option appears under names such as:
- Intel Virtualization Technology
- VT-x
- AMD-V
- SVM Mode
- Virtualization Technology
The exact location depends on your laptop or motherboard brand. Common BIOS entry keys include F2, Delete, Esc, or F10 during boot, but the menu structure varies by manufacturer. Intel’s official guidance specifically tells users to refer to the motherboard or BIOS vendor for the BIOS-side enablement steps, which is a reminder that there is no universal screen layout for all PCs.
After enabling virtualization in BIOS, save changes and fully restart the machine. This restart matters because Windows and Android Studio cannot use newly enabled CPU virtualization until the firmware setting has actually been applied through reboot. That is also why many people think the fix did not work—they change BIOS settings but do not complete the reboot cycle cleanly.
Step 2: On Windows, enable Windows Hypervisor Platform (WHPX)
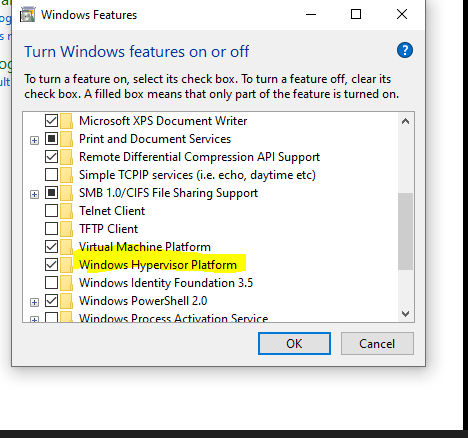
For current Windows-based Android Emulator setups, Google recommends Windows Hypervisor Platform. Its Android Emulator acceleration guide says Windows 10 version 1803 or higher is required for WHPX, and shows the setup path through Turn Windows features on or off, where you enable Windows Hypervisor Platform and then restart the computer.
The simplest steps are:
- Open Start.
- Search for Turn Windows features on or off.
- Open it.
- Check Windows Hypervisor Platform.
- Click OK.
- Restart the PC.
This is the best default advice for most developers using modern Android Studio on Windows. It is also the most future-ready advice because Google has already announced the phase-out of the Android Emulator Hypervisor Driver by the end of 2026, while WHPX is the Microsoft-supplied option Android recommends on Windows.
Step 3: Understand the difference between WHPX and Hyper-V
A lot of confusion comes from mixing up Hyper-V, Hyper-V Hypervisor, and Windows Hypervisor Platform as though they are all the same thing. They are related, but not identical in how users encounter them. Android’s emulator guide explicitly says some Windows components may activate the Windows Hyper-V hypervisor even when the WHPX checkbox is not selected, and mentions that security features such as Hyper-V and Core Isolation can also affect the virtualization environment.
Microsoft also documents how to determine whether a hypervisor is running by opening msinfo32.exe and checking for the message: “A hypervisor has been detected. Features required for Hyper-V will not be displayed.” That message is useful because it confirms Windows sees an active hypervisor layer.
For Android Emulator in 2026, the practical takeaway is simple: if you are following the current recommended route, prioritize WHPX and avoid getting trapped in outdated tutorials that focus only on older acceleration stacks. Google’s current recommendation is clear on that point.
Step 4: If needed, enable Hyper-V on supported Windows editions
Microsoft documents that the Hyper-V role can be enabled through Control Panel, PowerShell, or DISM on supported Windows editions, and lists Windows 10 Pro or Enterprise and Windows 11 Pro or Enterprise as supported for the Hyper-V role. Microsoft also states that the Hyper-V role cannot be installed on Windows 10 Home or Windows 11 Home.
If you are on a supported edition and need Hyper-V enabled, Microsoft provides these methods:
Using PowerShell as Administrator:
Enable-WindowsOptionalFeature -Online -FeatureName Microsoft-Hyper-V -All
Using DISM as Administrator:
DISM /Online /Enable-Feature /All /FeatureName:Microsoft-Hyper-V
These commands come directly from Microsoft’s installation guidance, and a restart is required afterward.
That said, for Android Emulator specifically, current Android guidance points Windows users toward WHPX rather than telling everyone to install the full Hyper-V role first. So if your goal is only to fix Android Emulator acceleration, start with BIOS virtualization plus WHPX unless you have a separate reason to need the full Hyper-V feature set.
Step 5: Use the correct emulator system image
Many users enable virtualization correctly but still end up with a slow or non-accelerated emulator because they created the wrong type of AVD. Google’s Android Emulator acceleration page states that x86 or x86_64 system images are required for accelerated use on x86_64 development environments, and warns that AVDs using unsupported combinations such as ARM- or MIPS-based images on Intel or AMD CPUs cannot use the VM acceleration described there.
This is a critical detail. If your emulator image is not acceleration-friendly, BIOS and Windows fixes alone will not solve the problem. When creating an AVD, choose an image that matches the emulator acceleration guidance—on typical Windows PCs with Intel or AMD CPUs, that usually means using x86 or x86_64 system images for best accelerated performance.
Read : How to Create Android Emulator in Android Studio Step by Step
Step 6: Check graphics mode if the emulator opens but behaves badly
Not every emulator problem is pure VT-x failure. Sometimes virtualization is working, but rendering is unstable or slow because of graphics configuration. Google’s documentation explains that AVDs can use either hardware or software graphics acceleration, and that auto is the recommended graphics mode for most users. It also notes that unsupported graphics acceleration settings can cause crashes or incorrect display output.
If the emulator starts but shows black screens, heavy lag, or graphical corruption, edit the AVD and inspect the Graphics acceleration setting under Emulated Performance. In many cases, leaving it on auto is best; if that fails, switching to software rendering can help identify whether the issue is GPU-related rather than virtualization-related. That does not replace VM acceleration, but it can solve the second layer of emulator instability.
Step 7: Check whether virtualization software conflicts are blocking acceleration
Google notes that depending on the OS and hypervisor, some software using other virtualization technologies may not run at the same time as a VM-accelerated emulator. It specifically mentions virtual machine solutions and some other software categories as possible conflicts. Microsoft also documents that certain virtualization applications may not run alongside Hyper-V and dependent features, and gives steps for checking whether the Hyper-V hypervisor is running.
This matters if you also use tools like other desktop virtualization platforms or security settings that rely on the Windows hypervisor. In those cases, the issue is not always “virtualization disabled.” Sometimes the issue is “virtualization is active, but a different stack is occupying the environment in a way your current emulator setup does not expect.” That is why the fix should be approached methodically, not by randomly toggling settings.
Step 8: If you are using the old Android Emulator Hypervisor Driver, know what changes in 2026
Google still documents the Android Emulator Hypervisor Driver (AEHD), but its Android Emulator acceleration page clearly says that this driver will be sunset on December 31, 2026 and Windows users should transition to WHPX before then. Google also explains that if you are using AEHD, Windows features that activate the Hyper-V hypervisor must be disabled for that old path, and it provides service-check commands such as sc query aehd to confirm whether the driver is running.
So if you find an older blog telling you to solve everything by installing AEHD, that advice is no longer the best long-term recommendation. In 2026, the cleaner and more future-safe article for readers is one that prioritizes WHPX, explains BIOS virtualization clearly, and treats AEHD as a legacy transitional option rather than the main fix.
How to verify whether your virtualization fix worked
Once you complete the BIOS and Windows changes, you should verify instead of guessing.
First, Microsoft recommends running:
systeminfo.exe
Then scroll to the Hyper-V Requirements section. Microsoft says if all required items show Yes, your system can run the Hyper-V role; if any item shows No, check the listed requirements and adjust where possible.
Second, on Windows you can also open:
msinfo32.exe
Microsoft says if you see “A hypervisor has been detected”, Windows recognizes an active hypervisor layer. That helps you confirm whether the Windows virtualization environment is actually live.
Third, in Android Studio, recreate or edit the AVD with a proper x86/x86_64 image and test the emulator again. Google’s Android guidance makes clear that emulator acceleration depends not only on system support but also on the chosen AVD image and emulator configuration.
What to do if VT-x is enabled in BIOS but Android Emulator still fails
This is one of the most frustrating situations, and it is also one of the most common.
If VT-x or AMD-V is enabled in BIOS but the emulator still fails, work through this order:
1. Recheck Windows features
Make sure Windows Hypervisor Platform is enabled and the system has been restarted. Android explicitly documents WHPX as the recommended Windows hypervisor path.
2. Recreate the AVD with the correct image
Choose an x86 or x86_64 image rather than an ARM image when you want accelerated emulator performance on Intel/AMD Windows machines. Google explicitly warns unsupported image combinations will not use VM acceleration.
3. Check for virtualization conflicts
If you are using older AEHD-based instructions, Google says Hyper-V-related Windows features must be disabled for that path. If you are using WHPX, follow the WHPX route consistently instead of mixing legacy and current guidance. Microsoft also documents coexistence issues between Hyper-V and some other virtualization applications.
4. Confirm your Windows edition and hardware requirements
If you are trying Hyper-V role installation, remember Microsoft says the role is not available on Home editions. Also verify SLAT and VM Monitor Mode support through Microsoft’s requirements guidance.
5. Update Android Studio and Emulator
Google’s current acceleration guide includes minimum version notes for Android Studio and Android Emulator in the WHPX section. If you are following modern setup steps on an outdated toolchain, you can run into misleading errors.
Can you run Android Emulator inside another virtual machine?
Yes, but that is a separate case called nested virtualization, and it has extra requirements. Microsoft documents nested virtualization for Hyper-V and notes that it allows Hyper-V to run inside a virtual machine on supported Windows platforms, including scenarios involving emulators. It also lists platform-specific prerequisites, especially for AMD and newer Windows versions.
For most beginner developers, this is not the first thing to troubleshoot. If you are using Android Studio directly on your own physical Windows laptop or desktop, you should focus first on BIOS virtualization, WHPX, correct AVD image selection, and conflict cleanup. Only explore nested virtualization if your development machine itself is already a VM.
Read : Android Studio Download and Android SDK Setup steps for Flutter Development
Is using a physical Android device better than fighting emulator issues?
Sometimes, yes.
Google’s Android Studio documentation still presents the Android Emulator as the preferred testing method for a wide range of device configurations, but it also documents running apps on a physical device. In practical terms, if your current machine does not support virtualization properly, or the BIOS option is locked by the manufacturer or organization, a real Android phone may be the fastest temporary workaround while you fix the emulator environment.
That does not make the emulator unimportant. Emulator acceleration is still valuable because it enables repeatable testing across API levels, screen sizes, and virtual device profiles. But when you need productivity right away, using a physical device can keep development moving while you resolve the VT-x or WHPX issue properly.
Best practical fix order for most readers
If you want the shortest useful version of this entire guide, do the following in order:
- Confirm your CPU supports virtualization and your system meets the requirements. Use
systeminfo.exe. - Enter BIOS/UEFI and enable Intel VT-x or AMD-V / SVM.
- In Windows, enable Windows Hypervisor Platform and restart.
- In Android Studio, create a new AVD using an x86/x86_64 system image.
- If graphics are broken, review the AVD graphics mode and keep it on auto first.
- If you followed old AEHD tutorials, move toward WHPX because Android recommends it on Windows and AEHD is being sunset at the end of 2026.
- If needed, use
msinfo32.exeto confirm whether Windows detects an active hypervisor.
Read : Document/discuss reason for deprecation and comment on future directions
Final thoughts
The Android Emulator VT-x problem is one of those issues that looks complicated because the error messages are inconsistent, but the underlying logic is straightforward. The emulator needs a supported processor, firmware virtualization enabled, the correct Windows hypervisor path, and a compatible AVD image. Google’s current guidance for Windows clearly points users toward WHPX, while Microsoft’s documentation clarifies the BIOS, OS, and hardware requirements that must be satisfied before virtualization works properly.
So the real solution is not “click one checkbox and hope.” The real solution is to fix the stack in the correct order: CPU support, BIOS virtualization, Windows hypervisor setup, emulator image choice, and conflict cleanup. Once those are aligned, the Android Emulator usually goes from unusable to fast and reliable.
FAQ
VT-x is Intel’s hardware virtualization technology. Android Emulator uses processor virtualization support through a hypervisor to accelerate execution. AMD systems use AMD-V / SVM for the same general purpose.
Microsoft recommends checking systeminfo.exe for Hyper-V requirements and using msinfo32.exe to see whether a hypervisor has been detected.
Google currently recommends Windows Hypervisor Platform (WHPX) on Windows for Android Emulator acceleration.
You may be using the wrong AVD image, have a graphics acceleration issue, or have a conflict with another virtualization layer or legacy setup. Google says unsupported system image combinations cannot use the documented VM acceleration.
Google still documents it, but says the Android Emulator Hypervisor Driver will be sunset on December 31, 2026 and recommends moving Windows users to WHPX.