

How to Configure Flutter SDK Path in Android Studio (Step-by-Step Guide for Beginners)

Setting up Flutter correctly is the first and most important step for mobile app development. One of the most common issues beginners face is understanding how to configure Flutter SDK path in Android Studio properly.
If the Flutter SDK path is not configured correctly, Android Studio will not detect Flutter, and you will face issues like:
- Flutter plugin not working
- Dart SDK not found
- Unable to run Flutter apps
In this detailed guide, you will learn how to configure Flutter SDK path in Android Studio step by step, even if you are a complete beginner.
What is Flutter SDK Path?
Before configuring, it is important to understand what Flutter SDK path actually means.
The Flutter SDK path is the location on your system where Flutter is installed.
For example:
- Windows:
C:\flutter - macOS:
/Users/username/flutter
Read : How to Set Flutter Path in Windows (Step-by-Step Guide for Beginners)
Android Studio needs this path to:
- Locate Flutter tools
- Run Flutter commands
- Build and debug apps
Why Configuring Flutter SDK Path is Important
Configuring Flutter SDK path in Android Studio is necessary because:
- It connects Android Studio with Flutter
- Enables Flutter plugin functionality
- Allows project creation and execution
- Fixes “Flutter SDK not found” errors
Without this configuration, Flutter development cannot work properly.
Prerequisites Before Configuration
Before you configure Flutter SDK path in Android Studio, make sure:
- Flutter SDK is downloaded
- Android Studio is installed
- Flutter and Dart plugins are installed
Read : Android Studio Download and Android SDK Setup steps for Flutter Development
Step-by-Step: How to Configure Flutter SDK Path in Android Studio
Follow these steps carefully.
Step 1: Open Android Studio
- Launch Android Studio
- Wait for the welcome screen
Step 2: Go to Settings
- Click on File → Settings (Windows/Linux)
- On macOS: Android Studio → Preferences
Step 3: Locate Flutter Settings
- In the left panel, search for Flutter
- Click on Flutter section
If Flutter option is not visible:
- Install Flutter plugin first
- Restart Android Studio
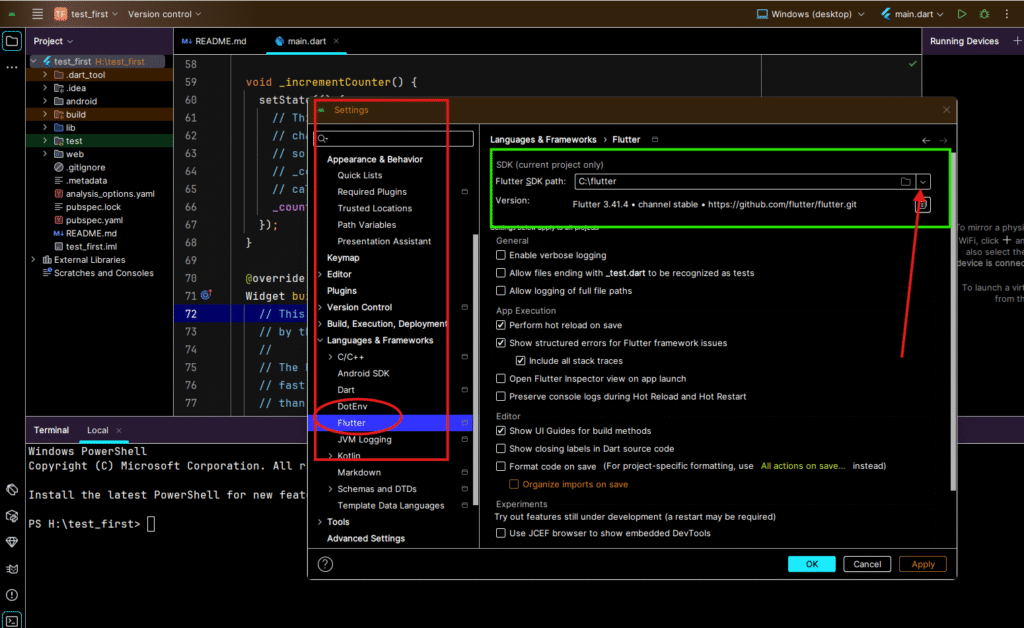
Step 4: Set Flutter SDK Path
You will see a field:
Flutter SDK Path
Now:
- Click on the folder icon
- Navigate to your Flutter installation directory
- Select the Flutter folder
Example:
C:\flutter
Step 5: Apply and Save
- Click Apply
- Click OK
Android Studio will now:
- detect Flutter SDK
- auto-configure Dart SDK
Step 6: Verify Configuration
To confirm everything is working:
- Open Terminal in Android Studio
- Run:
flutter doctor
If everything is correct, you will see:
- Flutter installed
- Dart installed
- Android toolchain ready
Read : Flutter Doctor command — What is flutter doctor (2026 Complete Guide)
Alternative Method (Manual Check via Terminal)
You can also verify Flutter SDK path manually.
Check Flutter Path
where flutter
or (macOS/Linux):
which flutter
This confirms whether Flutter is correctly installed.
Common Errors and Fixes
1. Flutter SDK Not Found
Reason:
- Incorrect path selected
Solution:
- Re-check Flutter folder
- Ensure it contains
/bindirectory
2. Dart SDK Not Configured
Reason:
- Flutter not detected
Solution:
- Reconfigure Flutter SDK path
- Restart Android Studio
3. Flutter Plugin Not Working
Solution:
- Go to Plugins
- Reinstall Flutter and Dart plugins
- Restart IDE
4. Command Not Found Error
Solution:
Add Flutter to system PATH:
Windows:
C:\flutter\bin
Read : How to Set Flutter Path in Windows (Step-by-Step Guide for Beginners)
Best Practices for Flutter Setup
To avoid future issues:
- Keep Flutter in a simple directory like
C:\flutter - Avoid spaces in folder path
- Run
flutter doctorafter setup - Keep Flutter updated
How This Helps in Real Development
Once you correctly configure Flutter SDK path in Android Studio:
- You can create Flutter projects
- Run apps on emulator or device
- Use hot reload
- Build production apps
This step is the foundation of your Flutter development journey.
Conclusion
Understanding how to configure Flutter SDK path in Android Studio is essential for every Flutter developer, especially beginners.
By following this step-by-step guide, you can:
- fix configuration issues
- properly set up your environment
- start building Flutter applications without errors
A correct setup ensures smooth development and saves hours of debugging time.
Configuring the Flutter SDK path in Android Studio is one of the most common setup tasks for beginners and one of the most frequent reasons behind Flutter project errors. Even if the SDK is downloaded correctly, Android Studio may fail to detect Flutter if the wrong directory is selected, the SDK is incomplete, or an FVM-managed project is pointing to a different path. That is why this topic should always be understood together with the full Flutter installation process, Android Studio setup, Git installation, and Flutter doctor validation. For a complete solution, also explore our related tutorials on Flutter installation on Windows, Flutter doctor command, FVM for Flutter development, and Flutter installation error fixes.
Frequently Asked Questions (FAQ)
The Flutter SDK path in Android Studio refers to the directory where the Flutter SDK is installed on your system. Android Studio uses this path to access Flutter tools, run commands, and build applications. Without setting the correct Flutter SDK path, Flutter projects cannot run properly.
You can find your Flutter SDK path by locating the folder where Flutter is installed. For example:
On Windows: C:\flutter
On macOS: /Users/username/flutter
You can also run the command:
flutter doctor -v
This will display the Flutter SDK location.
Flutter SDK path may not be detected due to:
Flutter plugin not installed
Incorrect path selected
Flutter not properly installed
To fix this, ensure that:
Flutter plugin is installed
Correct Flutter directory is selected
Restart Android Studio after setup
No, you do not need to configure Dart SDK separately. Once you correctly configure the Flutter SDK path in Android Studio, the Dart SDK is automatically detected and configured by Flutter.
If the Flutter SDK path is incorrect, you may face issues such as:
Flutter not recognized
Projects not running
Errors like “Flutter SDK not found”
Always ensure that you select the main Flutter folder, not the bin folder.
Yes, you can change the Flutter SDK path anytime from:
File → Settings → Flutter
After updating the path, restart Android Studio to apply changes.
To fix this error:
Open Android Studio Settings
Go to Flutter section
Set correct Flutter SDK path
Apply changes and restart
Also, run:
flutter doctor
to verify the setup.
Yes, adding Flutter to system PATH is recommended. It allows you to run Flutter commands from any terminal.
Example (Windows):
C:\flutter\bin
Run the following command:
flutter doctor
If everything is correctly configured, it will show all components as installed or fixed.