

Creating a custom keyboard in Flutter involves building a custom widget that mimics the behavior and appearance of a keyboard.
By default, a Flutter application uses the system keyboard when a text field is on focus. For certain reasons, an application may need to use a different custom keyboard.
Here’s a basic example to get you started:
import 'package:flutter/material.dart';

void main() {
  runApp(MyApp());
}

class MyApp extends StatelessWidget {
  @override
  Widget build(BuildContext context) {
    return MaterialApp(
      title: 'FLUTTERFEVER.COM',
      home: Scaffold(
        appBar: AppBar(
          title: Text('Custom Keyboard : FLUTTERFEVER.COM'),
        ),
        body: CustomKeyboard(),
      ),
    );
  }
}

class CustomKeyboard extends StatefulWidget {
  @override
  _CustomKeyboardState createState() => _CustomKeyboardState();
}

class _CustomKeyboardState extends State<CustomKeyboard> {
  String _inputText = '';

  void _onKeyPressed(String value) {
    setState(() {
      _inputText += value;
    });
  }

  void _onDeletePressed() {
    setState(() {
      if (_inputText.isNotEmpty) {
        _inputText = _inputText.substring(0, _inputText.length - 1);
      }
    });
  }

  @override
  Widget build(BuildContext context) {
    return Column(
      mainAxisAlignment: MainAxisAlignment.center,
      children: [
        Text(
          _inputText,
          style: TextStyle(fontSize: 24.0),
        ),
        SizedBox(height: 20.0),
        Row(
          mainAxisAlignment: MainAxisAlignment.center,
          children: [
            _buildKeyboardButton('1'),
            _buildKeyboardButton('2'),
            _buildKeyboardButton('3'),
          ],
        ),
        Row(
          mainAxisAlignment: MainAxisAlignment.center,
          children: [
            _buildKeyboardButton('4'),
            _buildKeyboardButton('5'),
            _buildKeyboardButton('6'),
          ],
        ),
        Row(
          mainAxisAlignment: MainAxisAlignment.center,
          children: [
            _buildKeyboardButton('7'),
            _buildKeyboardButton('8'),
            _buildKeyboardButton('9'),
          ],
        ),
        Row(
          mainAxisAlignment: MainAxisAlignment.center,
          children: [
            _buildKeyboardButton('0'),
            _buildKeyboardButton('.'),
            IconButton(
              icon: Icon(Icons.backspace),
              onPressed: _onDeletePressed,
            ),
          ],
        ),
      ],
    );
  }

  Widget _buildKeyboardButton(String value) {
    return ElevatedButton(
      onPressed: () => _onKeyPressed(value),
      child: Text(value),
    );
  }
}
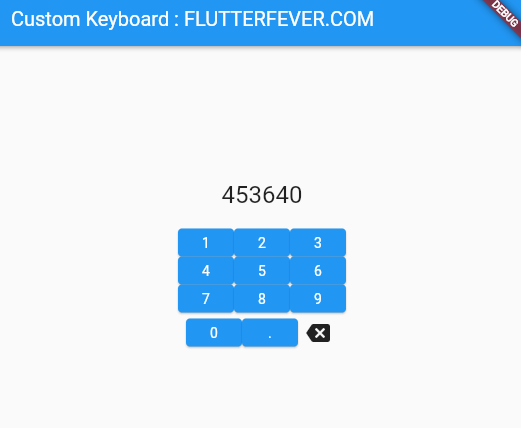
In this example:
- We have a
CustomKeyboardwidget that maintains the state of the input text. - The keyboard layout is structured using rows and columns.
- Each button press appends the corresponding value to the input text.
- There’s a delete button to remove the last character from the input text.
This is a basic example, and you can expand it by adding more functionality, such as special characters, shift keys, or different keyboard layouts. Customizing the appearance and behavior of the keyboard is entirely up to you and can be achieved by manipulating widgets and their properties.