

In this example, we are going to show you the way to add the “Scroll back to top and scroll top to bottom” button .
You can use this Flutter app example in your project. See the code below:
 import 'package:flutter/material.dart';

  void main() => runApp(const MyApp());

  class MyApp extends StatelessWidget {

    const MyApp({super.key});

    @override
    Widget build(BuildContext context) {
      return const MaterialApp(
        title: 'Flutterfever.com',
        home: MyPage(),

      );
    }
  }

  class MyPage extends StatefulWidget {

    const MyPage({super.key});

    @override
    State<StatefulWidget> createState() {
      return _MyPageState();
    }
  }

  class _MyPageState extends State<MyPage> {

    late final ScrollController _scrollController;
    bool _enableToTopButton = false;
    bool _enableToButtomButton = true;

    @override
    void initState() {
      _scrollController = ScrollController();

      _scrollController.addListener(() {
        setState(() {
          _enableToTopButton = _scrollController.offset >   _scrollController.position.minScrollExtent;
          _enableToButtomButton = _scrollController.offset <   _scrollController.position.maxScrollExtent;
        });
      });

      super.initState();
    }

    @override
    Widget build(BuildContext context) {
      return Scaffold(
        appBar: AppBar(
          title: const Text('Flutterfever.com'),

        ),
        body: ListView.builder(
          controller: _scrollController,
          itemCount: 100,
          itemBuilder: (BuildContext context, int index) {
            return SizedBox(
              height: 50,
              child: Card(
                color: Colors.red,
                child: Text(
                  'Count num: ${index + 1}',
                  style: const TextStyle(color: Colors.white),
                ),
              ),
            );
          },
        ),
        floatingActionButtonLocation: FloatingActionButtonLocation.startDocked,
        floatingActionButton: Padding(
          padding: const EdgeInsets.all(10.0),
          child: Column(
            mainAxisAlignment: MainAxisAlignment.end,
            children: <Widget>[
              FloatingActionButton(
                onPressed: () {
                  if (!_enableToTopButton) {
                    return;
                  }

                  _scrollController.animateTo(
                      _scrollController.position.minScrollExtent,
                      duration: const Duration(milliseconds: 500),
                      curve: Curves.fastLinearToSlowEaseIn
                  );
                },
                backgroundColor: _enableToTopButton ? Colors.blue : Colors.grey,
                child: const Icon(Icons.arrow_upward),
              ),
              const SizedBox(height: 10),
              FloatingActionButton(
                onPressed: () {
                  if (!_enableToButtomButton) {
                    return;
                  }

                  _scrollController.animateTo(
                      _scrollController.position.maxScrollExtent,
                      duration: const Duration(milliseconds: 500),
                      curve: Curves.fastLinearToSlowEaseIn
                  );
                },
                backgroundColor: _enableToButtomButton ? Colors.blue : Colors.grey,
                child: const Icon(Icons.arrow_downward),
              ),
            ],
          ),
        ),
      );
    }
  }
Output:
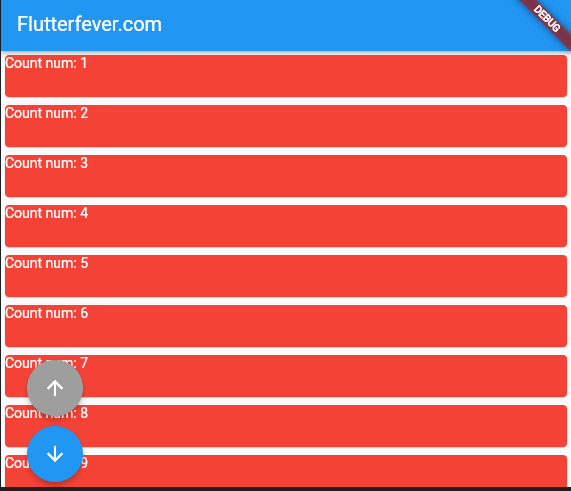
In this example:
- We have a
ListView.builderwidget with a list of 100 items. - We create a
ScrollControllernamed_scrollControllerto control the scrolling behavior of theListView. - Two
FloatingActionButtons are used: one for scrolling to the top and the other for scrolling to the bottom. - Each
FloatingActionButtontriggers theanimateTomethod of theScrollControllerwith appropriate parameters to scroll to the top or bottom of the list.
To scroll to the top or bottom of a scrollable widget in Flutter, you can utilize a ScrollController which has to be set as the controller of the scrollable widget. Call the animateTo method to programmatically animate the position to a particular offset. The position.minScrollExtent value of the controller can be used to get the minimum offset for scrolling to the top. Meanwhile, for scrolling to the bottom, use the value of position.maxScrollExtent as the new offset.