

How to Create Android Emulator in Android Studio Step by Step

If you are starting Android or Flutter app development, one of the first things you need is an Android emulator. An emulator allows you to run and test your application on a virtual Android device directly from your computer. This is especially useful when you do not want to depend on a physical phone every time you build or debug your app.
In this complete guide, you will learn how to create Android emulator in Android Studio step by step. This tutorial is suitable for beginners, Flutter developers, Android developers, and anyone who wants to set up a virtual device inside Android Studio in a clean and professional way.
By the end of this guide, you will understand how to open Device Manager, add a new virtual device, choose the right phone profile, select the correct Android system image, and launch the emulator successfully.
Why You Need an Android Emulator
Before learning how to create Android emulator in Android Studio, it is important to understand why the emulator is useful.
An Android emulator helps developers:
- test apps without using a real device
- check UI on different screen sizes
- simulate Android versions
- debug issues quickly
- verify responsive layouts
- test app flow before deployment
For Flutter developers, an Android emulator is one of the fastest ways to run and test Flutter apps from Android Studio or VS Code.
What You Need Before Creating an Emulator
Before you begin, make sure the following things are ready on your system:
- Android Studio is installed
- Android SDK is installed
- Device Manager is available in Android Studio
- virtualization is enabled on your computer
- required emulator packages are installed
- enough RAM and disk space are available
If Android Studio is already installed and opening correctly, you can move directly to the emulator creation process.
Read : Android Studio Download (Latest) for Windows, macOS and Linux for Flutter
Step 1: Open Android Studio and Go to Device Manager
The first step in how to create Android emulator in Android Studio is opening the Device Manager.
In Android Studio, the Device Manager is the section where you can create, edit, start, and manage virtual devices.
From the top-right area of Android Studio, click the Device Manager icon. Once opened, you will see your currently available devices, including both virtual devices and connected physical devices.
What you will see here
- existing emulators, if already created
- connected physical Android phone, if attached
- option to add a new emulator
- play button to launch an emulator
Reference image
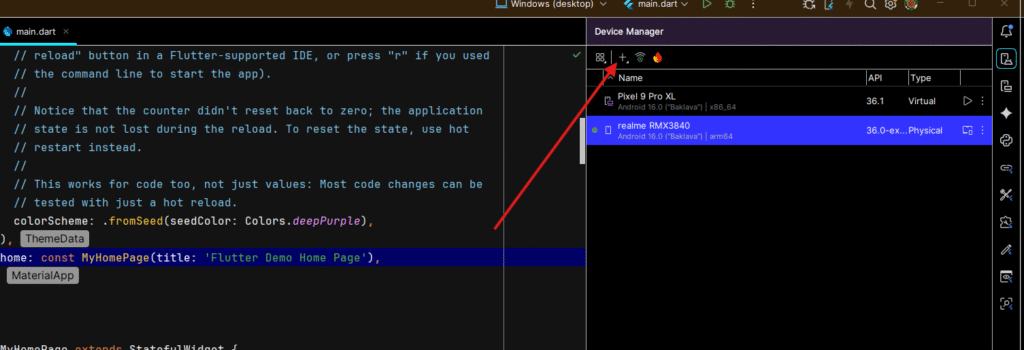
In the image above, the arrow points to the Device Manager section inside Android Studio.
Step 2: Click the Add Device Option
Once the Device Manager is open, the next step is to create a new virtual device.
At the top of the Device Manager, click the plus (+) icon or Add Device option. This is the starting point for creating a new Android emulator.
Why this step matters
This tells Android Studio that you want to add a new Android Virtual Device, also called an AVD.
Reference image
In the image above, the highlighted area shows where you need to click to add a new emulator.
Step 3: Choose a Device Category and Hardware Profile
After clicking Add Device, Android Studio opens a new configuration window where you choose the device type.
Here, you will see different device categories such as:
- Phone
- Tablet
- Wear OS
- Desktop
- TV
- Automotive
- XR
For most developers, especially Flutter developers, Phone is the most common choice.
Then you need to select a hardware profile. In your example, Pixel 9a is selected, but you can choose any suitable device based on your development needs.
How to choose the right hardware profile
If you are a beginner, choose a standard phone profile such as:
- Pixel 7
- Pixel 8
- Pixel 9a
- Pixel 9 Pro
- Medium Phone
These are good choices because they closely represent common Android phone screen sizes and densities.
Things to consider when choosing a profile
- screen resolution
- screen size
- density
- performance on your PC
- compatibility with your app testing goals
Reference image
In the image above:
- the left side shows Form Factor
- Phone is selected
- a device profile such as Pixel 9a is chosen from the list
This is a very important step in how to create Android emulator in Android Studio, because the selected hardware profile defines the virtual phone you will use for testing.
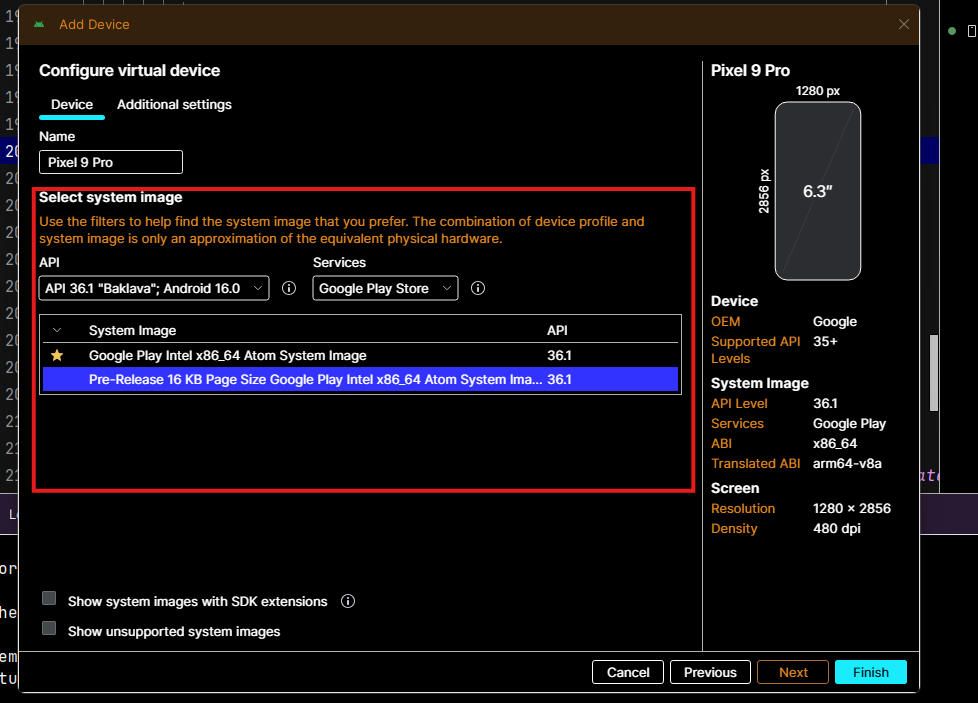
Step 4: Click Next and Select a System Image
Once you select the hardware profile, click Next.
Now Android Studio will show the Select system image screen. This is where you choose the Android version your emulator will run.
In your screenshot, the selected API is:
- API 36.1
- Android 16.0
- Google Play Store image
- x86_64 system image
What is a system image?
A system image is the Android operating system package used by the emulator. It defines the Android version and system environment your virtual device will run.
Common things shown on this screen
- Android API level
- Google Play support
- CPU architecture
- supported ABI
- available downloadable images
Best choice for most developers
If your system supports it, select:
- a Google Play image if you want Play Store support
- an x86_64 image for better performance on most development machines
- a recent stable Android version for modern app testing
Reference image
In the image above, the system image selection panel is highlighted. This is where you choose the Android OS image for your emulator.
Step 5: Review Emulator Configuration and Finish Setup
After selecting the system image, click Next or Finish, depending on the Android Studio flow.
At this stage, Android Studio creates the emulator configuration using:
- selected hardware profile
- selected Android API version
- selected system image
- default emulator settings
You can also rename the emulator if needed. For example, you may use names like:
- Pixel 9 API 36
- Flutter Test Device
- Android 16 Emulator
- Pixel 9a Debug Device
A clear emulator name helps if you work with multiple virtual devices.
Step 6: Launch the Emulator from Device Manager
Once the emulator is created, it will appear in Device Manager as a new virtual device.
Now you simply need to click the play button beside the emulator name. This launches the Android emulator window.
Reference image

In the image above:
- the emulator is listed in Device Manager
- the play button is visible on the right side
- clicking that play button starts the virtual device
This is the final practical step in how to create Android emulator in Android Studio.
Step 7: Wait for the Emulator to Boot
After clicking the play button, Android Studio opens the emulator window.
The emulator may take some time to boot depending on:
- your PC performance
- RAM availability
- CPU virtualization support
- selected Android version
- selected system image
When the emulator starts successfully, you will see the Android home screen just like a real device.
What you can do after boot
- unlock the device
- install and run your app
- test UI and navigation
- debug Flutter or Android code
- simulate app interactions
Read : How do I launch the Android emulator from the command line in 2026?
Step 8: Run Your Flutter or Android App on the Emulator
After the emulator is running, you can select it as the target device in Android Studio or VS Code.
For Flutter developers, this means you can now run:
flutter run
Or use the run button in Android Studio.
The emulator behaves like a real Android phone, so you can:
- test screens
- inspect UI responsiveness
- debug layout issues
- test app navigation
- verify plugin behavior
Read : How to Build Your First App with Flutter: Beginner-Friendly Step-by-Step Tutorial
Understanding Important Emulator Parameters
If you want to fully understand how to create Android emulator in Android Studio, you should also know the meaning of the main parameters shown during setup.
1. Form Factor
This defines the device type:
- Phone
- Tablet
- Wear OS
- TV
- Desktop
- Automotive
- XR
For mobile app development, Phone is usually the best option.
2. Hardware Profile
This defines the physical characteristics of the virtual device, such as:
- width
- height
- screen size
- resolution
- density
A Pixel series device is usually a good default choice.
3. API Level
API level represents the Android version.
Examples:
- API 33
- API 34
- API 35
- API 36.1
Higher API means newer Android version.
4. System Image
This is the Android OS package the emulator runs.
It may include:
- Google APIs
- Google Play
- x86_64 architecture
- arm64-v8a compatibility
5. ABI
ABI means the supported CPU architecture.
Common options:
- x86_64
- arm64-v8a
For most PC setups, x86_64 emulator images perform better.
6. Play Store Support
Some system images include Google Play Store. These are useful when your app needs:
- Play services
- sign-in services
- Play-related functionality
- more realistic device behavior
Read : How to Deploy Flutter App on Google Play Store in 2026 (Complete Checklist)
Best Settings for Flutter Developers
If you are a Flutter developer, here are some practical suggestions for emulator setup.
Recommended device profile
Choose a common phone model such as:
- Pixel 7
- Pixel 8
- Pixel 9a
- Pixel 9 Pro
Recommended system image
Use:
- recent stable API
- Google Play image if needed
- x86_64 if supported
Why this setup works well
It provides:
- better compatibility
- realistic testing
- good UI preview
- improved performance
Common Problems While Creating Android Emulator
Many beginners face issues when learning how to create Android emulator in Android Studio. Here are some common problems and what they usually mean.
Emulator is not starting
Possible reasons:
- virtualization is disabled
- insufficient RAM
- corrupted emulator image
- missing SDK tools
No system images available
Possible reasons:
- Android SDK components not installed
- internet connection issue
- SDK Manager packages missing
Emulator is too slow
Possible reasons:
- low RAM
- heavy system load
- unsupported acceleration
- using a very high-end virtual device on a weak PC
Play button is disabled
Possible reasons:
- emulator configuration incomplete
- system image not properly installed
- Android Studio cache issue
Tips to Make Android Emulator Run Better
Once you know how to create Android emulator in Android Studio, the next important thing is performance.
Here are some practical tips:
- keep enough free RAM
- close unnecessary apps before launching emulator
- use x86_64 images when possible
- avoid very large device profiles on low-end systems
- keep Android Studio and SDK tools updated
- enable hardware acceleration and virtualization
These steps help the emulator boot faster and respond better.
Why This Emulator Setup Is Helpful for Flutter Development
Flutter developers often need fast visual testing. A properly configured Android emulator helps in:
- checking hot reload results instantly
- testing layout on modern Android versions
- debugging plugins
- verifying navigation flow
- testing forms, animations, and responsive UI
If you are building apps for Android users, an emulator is a core part of the workflow.
Frequently Asked Questions
Open Device Manager, click Add Device, choose Phone, select a hardware profile, pick a system image, and click Finish.
A Pixel phone profile such as Pixel 8, Pixel 9a, or Pixel 9 Pro is usually a good starting point.
A recent stable Android image with x86_64 support is a practical option for most developers. If needed, choose a Google Play image.
Yes. Flutter works very well with Android Studio emulators.
This is usually caused by low RAM, disabled virtualization, or heavy system load.