

First Flutter App Explained for Beginners: Understand the Flutter Counter App Step by Step

When beginners start learning Flutter, the first program they usually see is the default counter app. At first glance, it looks simple: there is a number on the screen, a floating button at the bottom, and every time you tap the button, the number increases. But for someone new to Flutter, this app raises many questions.
- What does
main()do? - Why do we use
runApp()? - What is the difference between
StatelessWidgetandStatefulWidget? - What does
setState()actually do? - How does Flutter know when to refresh the screen?
These questions are normal. In fact, understanding this first Flutter app properly is one of the best ways to build a strong foundation. The default counter app may be small, but it introduces some of the most important concepts in Flutter, including widgets, app structure, state management, UI rebuilding, layout, and user interaction.
In this guide, you will learn your first Flutter app explained step by step in a way that is easy for beginners to understand. We will go through the code section by section and explain what each part does, why it is used, and how the full app works together.
Corrected Flutter Counter App Code
Before we begin, here is the corrected version of the code. Your original snippet had two small syntax issues:
ColorScheme.fromSeed(...)was incompleteMainAxisAlignment.centerwas incomplete
Here is the proper version:
import 'package:flutter/material.dart';void main() {
  runApp(const MyApp());
}
class MyApp extends StatelessWidget {
  const MyApp({super.key});  @override
  Widget build(BuildContext context) {
    return MaterialApp(
      title: 'Flutter Demo',
      theme: ThemeData(
        colorScheme: ColorScheme.fromSeed(seedColor: Colors.deepPurple),
      ),
      home: const MyHomePage(title: 'Flutter Demo Home Page'),
    );
  }
}class MyHomePage extends StatefulWidget {
  const MyHomePage({super.key, required this.title});  final String title;  @override
  State<MyHomePage> createState() => _MyHomePageState();
}class _MyHomePageState extends State<MyHomePage> {
  int _counter = 0;  void _incrementCounter() {
    setState(() {
      _counter++;
    });
  }  @override
  Widget build(BuildContext context) {
    return Scaffold(
      appBar: AppBar(
        backgroundColor: Theme.of(context).colorScheme.inversePrimary,
        title: Text(widget.title),
      ),
      body: Center(
        child: Column(
          mainAxisAlignment: MainAxisAlignment.center,
          children: [
            const Text('You have pushed the button this many times:'),
            Text(
              '$_counter',
              style: Theme.of(context).textTheme.headlineMedium,
            ),
          ],
        ),
      ),
      floatingActionButton: FloatingActionButton(
        onPressed: _incrementCounter,
        tooltip: 'Increment',
        child: const Icon(Icons.add),
      ),
    );
  }
}
What This App Does
This app is a very basic Flutter counter application.
It shows:
- a title bar at the top
- a message in the center of the screen
- a number that starts at
0 - a floating action button with a plus icon
Whenever the user taps the button, the number increases by 1.
That is all it does. But behind this small example, Flutter is teaching you many important concepts:
- how an app starts
- how widgets are built
- how state changes
- how the UI updates
- how layout works
- how button actions are handled
1. Importing the Material Package
import 'package:flutter/material.dart';
This line imports Flutter’s Material Design library.
Flutter provides many widget libraries, and material.dart includes the most commonly used Material Design widgets such as:
MaterialAppScaffoldAppBarTextColumnCenterFloatingActionButton
Without this import, Flutter would not know what these widgets are.
Think of it like this: before using tools in a toolbox, you need to open the toolbox first. This import statement opens the Material toolbox for your Flutter app.
2. The main() Function
void main() {
  runApp(const MyApp());
}
Every Dart program starts from the main() function. This is the entry point of the application.
What does void main() mean?
voidmeans the function returns nothingmain()means this is the starting point of the program
Read : What is the main() function in Dart?
What does runApp() do?
runApp() tells Flutter which widget should be displayed first on the screen.
In this case:
runApp(const MyApp());
This means Flutter will start the app by loading the MyApp widget.
So if you want to understand where your Flutter app begins, the answer is simple:
It starts in main(), and runApp() loads the root widget.
3. The Root Widget: MyApp
class MyApp extends StatelessWidget {
  const MyApp({super.key});
This class represents the root of the application.
Why is it called a root widget?
Because it is the first widget loaded by runApp(), and all other widgets in the app come under it.
Why does it extend StatelessWidget?
Because MyApp itself does not manage any changing data. It just sets up:
- the app title
- the theme
- the home screen
Since it does not need to update dynamically, StatelessWidget is the correct choice.
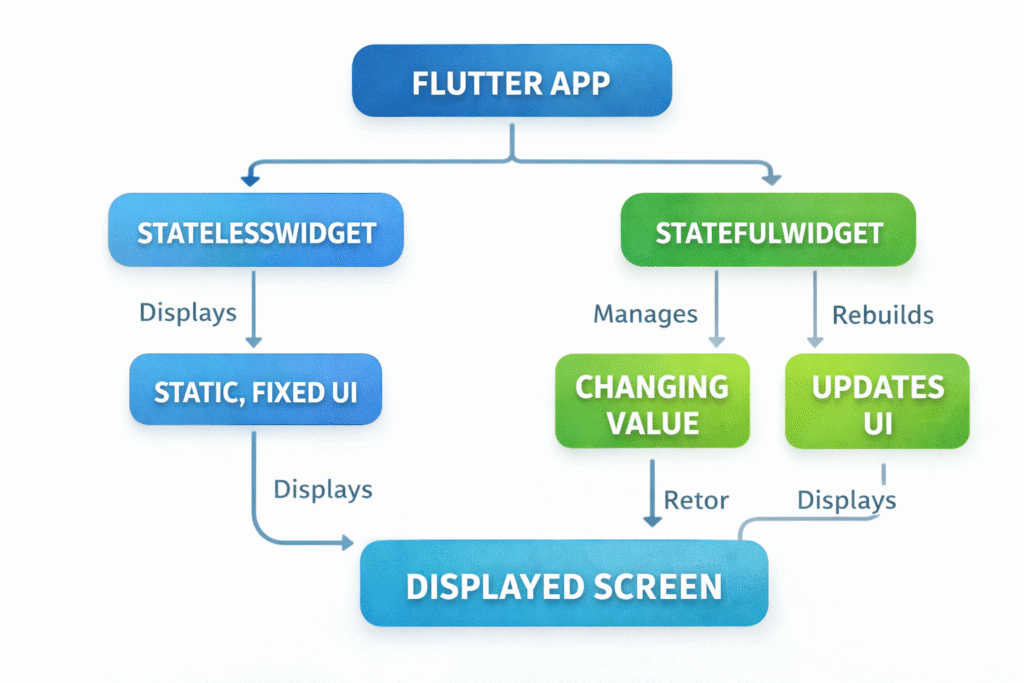
4. What Is a StatelessWidget?
A StatelessWidget is a widget whose UI does not change over time based on internal state.
That does not mean it can never rebuild. It means the widget itself does not hold mutable state that changes during the app’s life.
In this app, MyApp is stateless because it only defines the overall structure of the application.
Use a StatelessWidget when:
- the UI is fixed
- the displayed data does not change
- the widget only shows information passed into it
Read : How many types App Lifecycle In Flutter ?
5. The Constructor
const MyApp({super.key});
This is the constructor of the MyApp class.
Why use const?
const tells Flutter that this widget is constant and can be optimized.
What is super.key?
A key helps Flutter identify widgets in the widget tree more efficiently. Beginners do not need to worry too much about it yet, but it is a standard part of widget constructors.
6. The build() Method
@override
Widget build(BuildContext context) {
Every widget must define a build() method.
The build() method describes what the widget should display on the screen.
What does it return?
It returns another widget. In Flutter, everything is a widget, so the UI is built by returning widgets inside other widgets.
Read : What is the Dart Return Values in Dart?
What is BuildContext?
BuildContext gives access to information about the widget’s position in the widget tree. It is often used for:
- themes
- navigation
- inherited widgets
- media queries
For beginners, the important idea is this:
The build() method tells Flutter what to draw on the screen.
7. MaterialApp: The App Wrapper
return MaterialApp(
  title: 'Flutter Demo',
  theme: ThemeData(
    colorScheme: ColorScheme.fromSeed(seedColor: Colors.deepPurple),
  ),
  home: const MyHomePage(title: 'Flutter Demo Home Page'),
);
MaterialApp is a top-level widget that wraps your app with Material Design behavior.
It helps set up:
- the app title
- the theme
- navigation
- the home screen
title
title: 'Flutter Demo',
This is the title of the app.
theme
theme: ThemeData(
  colorScheme: ColorScheme.fromSeed(seedColor: Colors.deepPurple),
),
This defines the app’s color theme. Flutter generates a full color scheme based on the seed color deepPurple.
home
home: const MyHomePage(title: 'Flutter Demo Home Page'),
This defines the first screen that appears when the app starts.
So MaterialApp is like the foundation of the whole app.
8. The Home Screen: MyHomePage
class MyHomePage extends StatefulWidget {
This class represents the home page of the app.
Unlike MyApp, this widget is a StatefulWidget.
Why? Because the home page contains data that changes: the counter value.
9. What Is a StatefulWidget?
A StatefulWidget is a widget that can change over time.
In this app:
- the counter starts at
0 - when the button is pressed, the value changes
- the UI must update to show the new number
That is exactly when StatefulWidget is needed.
Use a StatefulWidget when:
- the displayed value changes
- the widget responds to user interaction
- the UI needs to rebuild with updated data
10. Constructor and Title in MyHomePage
const MyHomePage({super.key, required this.title});final String title;
This widget receives a value called title.
required this.title
This means the title must be passed when creating MyHomePage.
final String title
This declares a string variable named title that cannot be changed after it is assigned.
The parent widget (MyApp) passes the title:
home: const MyHomePage(title: 'Flutter Demo Home Page'),
So the home page now has access to that title.
11. The createState() Method
@override
State<MyHomePage> createState() => _MyHomePageState();
A StatefulWidget itself is not where the changing data lives. Instead, it creates a separate state class.
This method tells Flutter:
Use _MyHomePageState to manage the state of MyHomePage.
12. The State Class
class _MyHomePageState extends State<MyHomePage> {
This is where the dynamic part of the app lives.
Inside this class, we have:
- the counter variable
- the increment function
- the UI that rebuilds when state changes
Why does the class name start with _?
In Dart, a name starting with _ is private to the file. This means _MyHomePageState is only meant to be used inside this file.
13. The Counter Variable
int _counter = 0;
This variable stores the current counter value.
intmeans it stores an integer_counteris the variable name= 0sets the initial value to zero
So when the app first loads, the number shown on the screen is 0.
14. The Increment Function
void _incrementCounter() {
  setState(() {
    _counter++;
  });
}
This function is called when the user presses the floating action button.
_counter++
This increases the value by 1.
Why use setState()?
setState() tells Flutter that the state has changed and the UI should be rebuilt.
Without setState(), the variable might change internally, but the screen would not update.
This is one of the most important beginner concepts in Flutter:
Changing data is not enough. You must also tell Flutter to rebuild the UI.
That is exactly what setState() does.
15. Building the UI with Scaffold
return Scaffold(
Scaffold provides the basic visual structure of a Material Design screen.
It gives you ready-made sections like:
appBarbodyfloatingActionButton
In this example, Scaffold acts like the layout skeleton of the page.
16. The AppBar
appBar: AppBar(
  backgroundColor: Theme.of(context).colorScheme.inversePrimary,
  title: Text(widget.title),
),
This creates the top app bar.
backgroundColor
The background color is taken from the app theme.
title: Text(widget.title)
This displays the title passed into MyHomePage.
Why widget.title?
Inside the state class, properties from the parent StatefulWidget are accessed using the widget keyword.
So widget.title means:
“Use the title from the MyHomePage widget.”
17. The body
body: Center(
  child: Column(
    mainAxisAlignment: MainAxisAlignment.center,
    children: [
      const Text('You have pushed the button this many times:'),
      Text(
        '$_counter',
        style: Theme.of(context).textTheme.headlineMedium,
      ),
    ],
  ),
),
This is the main content area of the screen.
Center
The Center widget places its child in the middle of the screen.
Column
The Column widget arranges its children vertically.
mainAxisAlignment: MainAxisAlignment.center
This centers the content vertically inside the column.
First Text
const Text('You have pushed the button this many times:')
This is a static message.
Second Text
Text(
  '$_counter',
  style: Theme.of(context).textTheme.headlineMedium,
)
This displays the current counter value dynamically.
What is '$_counter'?
This is string interpolation in Dart. It inserts the value of _counter into the string.
So if _counter is 5, the screen shows 5.
18. The Floating Action Button
floatingActionButton: FloatingActionButton(
  onPressed: _incrementCounter,
  tooltip: 'Increment',
  child: const Icon(Icons.add),
),
This creates the round button at the bottom right of the screen.
onPressed
This defines what should happen when the button is tapped.
Here it calls:
_incrementCounter
tooltip
This is a helpful label for accessibility and hover support.
child: const Icon(Icons.add)
This displays a plus icon inside the button.
19. What Happens When the Button Is Pressed?
Let’s follow the full sequence:
- The user taps the floating action button
onPressedtriggers_incrementCounter()_counterincreases by 1setState()tells Flutter the UI must rebuild- The
build()method runs again - The updated
_countervalue appears on the screen
This is the heart of Flutter’s reactive UI model.
20. StatelessWidget vs StatefulWidget in This App
This app is a perfect beginner example of the difference.
MyApp is a StatelessWidget
Because it only defines the app structure and does not manage changing data.
MyHomePage is a StatefulWidget
Because it contains a counter that changes over time.
A simple way to remember:
- StatelessWidget = fixed UI
- StatefulWidget = changing UI
21. Key Beginner Concepts You Learn from This App
This one small app teaches you many core Flutter concepts:
main()functionrunApp()- root widget
StatelessWidgetStatefulWidget- widget constructors
build()methodMaterialAppScaffoldAppBarCenterColumnTextFloatingActionButton- local state
setState()- UI rebuilding
That is why this example is so valuable for beginners.
22. Common Beginner Mistakes
Here are some common mistakes people make with this first app:
Forgetting setState()
The value changes, but the UI does not update.
Using StatelessWidget instead of StatefulWidget
Then Flutter cannot manage changing state correctly.
Confusing widget.title with _counter
widget.title comes from the parent widget, while _counter is local changing state.
Not understanding const
const is used for widgets that do not change. It helps Flutter optimize performance.
23. Final Summary
If you want to explain this app in the simplest possible way, it works like this:
main()starts the apprunApp()loads the root widgetMyAppsets up the app theme and home screenMyHomePagedisplays the counter screen_counterstores the number_incrementCounter()increases the numbersetState()rebuilds the UI- the updated number appears on the screen
Once you understand this app, Flutter starts making much more sense.
Read : How to Build Your First App with Flutter: Beginner-Friendly Step-by-Step Tutorial
Conclusion
The default Flutter counter app is more than just a demo. It is the first real lesson in how Flutter works. It teaches you the widget-based UI model, the difference between static and dynamic widgets, the role of state, and how Flutter rebuilds the interface when data changes.
If you truly understand this first app, you are not just copying code anymore. You are beginning to think like a Flutter developer.
That is the real value of learning the Flutter counter app properly.
FAQ
main() in Flutter? main() is the entry point of the Dart program. Flutter starts execution from this function and then loads the app with runApp().
runApp() do in Flutter? runApp() tells Flutter which widget should be displayed first. It loads the root widget of the application.
MyApp a StatelessWidget? MyApp does not manage changing data. It only sets up the app’s structure, theme, and home screen, so StatelessWidget is enough.
MyHomePage a StatefulWidget? MyHomePage needs to update the counter value when the button is pressed. Since the UI changes over time, it must be a StatefulWidget.
setState() do in Flutter? setState() tells Flutter that the internal state has changed and the UI should rebuild to reflect the new data.
_counter in this app? _counter is an integer variable that stores the current count displayed on the screen.
widget.title in the state class? widget.title gives access to the title property passed into the parent StatefulWidget.