

Flutter Installation and SDK Setup Guide Using VS Code in 2026
If you want to start Flutter app development the right way, your first priority should be a clean installation. Many beginners install Flutter, add a few extensions, and then get stuck on SDK path issues, Android licenses, or VS Code not detecting Flutter commands. The better approach is to set up Flutter step by step, verify the SDK, and configure Visual Studio Code properly from the start. Flutter’s current official install flow recommends using VS Code for a quick setup, while manual installation remains the best option when you want more control over the exact SDK location.
This guide explains how to install Flutter, set up the Flutter SDK, configure VS Code, verify your environment, and run your first Flutter app. It is written for beginners, but it also follows a production-minded workflow so your setup stays clean and scalable as your projects grow. Flutter’s official documentation also separates installation into quick setup with VS Code and manual setup for custom control, which is the same practical distinction used in this article.
Why use VS Code for Flutter development
VS Code has become one of the easiest ways to start Flutter development because it supports Flutter and Dart through dedicated extensions, gives you integrated terminal access, debugging, IntelliSense, hot reload, device selection, and project commands from the command palette. Flutter’s official docs include a dedicated installation path built around VS Code, and Flutter’s VS Code tool page confirms that the editor can compile, deploy, and debug Flutter apps once the Flutter extension is installed.
For most beginners, VS Code offers three major advantages. First, the setup is simpler than many full IDE workflows. Second, it is lightweight enough for day-to-day Flutter coding. Third, it scales well from beginner use to professional development because workspace settings and extension support make it easy to manage multiple projects and environments. VS Code’s own documentation explains the difference between user settings and workspace settings, which becomes useful later when you want project-specific configuration.
What you need before installing Flutter
Before you install Flutter, make sure the following basics are ready:
Git should be installed on your system, because Flutter’s recommended VS Code installation path for Windows includes Git as a prerequisite. VS Code should also be installed before you continue with the editor-based setup. On manual installation, Flutter recommends extracting the SDK into a clean folder path that does not require elevated privileges and does not include spaces or special characters.
Read : Download Flutter SDK (Windows) — Also for Mac & Linux
A practical Windows path for the Flutter SDK is:
C:\Users\YourName\develop\flutter
Flutter’s manual install guide specifically suggests using a path such as %USERPROFILE%\develop and advises against special characters, spaces, or protected system locations.
Recommended installation paths for beginners and professionals
There are two good ways to install Flutter today.
The first is the quick setup path through VS Code. Flutter officially recommends VS Code or another Code OSS-based editor for a fast installation experience, especially if your goal is to start building quickly.
The second is manual SDK installation. This is often better for developers who want to know exactly where Flutter is stored, who may later use version managers, or who want a more controlled setup. Flutter’s official manual guide says to download the latest stable SDK bundle from the SDK archive, extract it into a clean folder, and then work from that installation.
For a tutorial article, the best approach is to explain the manual SDK structure while still using VS Code as the main editor. That gives readers both clarity and practicality.
Read: Flutter SDK Archive Download in 2026 – Older Versions Flutter SDK
Step 1: Install Git
On Windows, install Git first. Flutter’s official VS Code installation path for Windows explicitly lists Git for Windows as a prerequisite. Without Git, some Flutter tooling operations can fail or become limited.
After installation, open Command Prompt and verify:
git --version
If Git prints a version number, your installation is working.
Read : Download Git for Flutter for Windows, Linux and macOS: Complete Step-by-Step Guide
Step 2: Install Visual Studio Code
Download and install Visual Studio Code. Flutter’s recommended quick setup uses VS Code as the primary editor, and the Flutter VS Code tool page confirms that the editor becomes fully capable for Flutter development once the proper extensions are added.
After installation, open VS Code once so the application creates its base settings and extension environment.
Step 3: Download the Flutter SDK
Now download the Flutter SDK. Flutter’s manual installation guide says to get the latest stable release bundle from the SDK archive, then extract it into your chosen SDK folder. It also notes that if flutter.bat is missing after extraction, antivirus software may have quarantined it, so the Flutter directory may need to be trusted and extracted again.
Read : Download Flutter SDK (Windows) — Also for Mac & Linux
A clean Windows setup looks like this:
C:\Users\YourName\develop\flutter
Do not extract Flutter inside:
C:\Program Files- the Desktop
- a deeply nested project folder
- a folder with spaces or unusual characters
The reason is simple: SDK tools behave more reliably when the path is short, clean, and user-owned. Flutter’s manual guide explicitly recommends a location like %USERPROFILE%\develop for this reason.
Step 4: Add Flutter to PATH
To use Flutter from any terminal, add the SDK’s bin folder to your system PATH.
On Windows, that usually means adding:
C:\Users\YourName\develop\flutter\bin
After updating PATH, close and reopen your terminal, then run:
flutter --version
If Flutter returns a version number, the SDK path is correctly configured. Flutter’s installation docs rely on this command-line access model throughout setup and verification.
Read : How to Set Flutter Path in Windows (Step-by-Step Guide for Beginners)
Step 5: Open VS Code and install Flutter and Dart extensions
Now open VS Code and go to Extensions. Search for:
- Flutter
- Dart
Install the Flutter extension first. VS Code’s JavaScript docs include a note that Dart and Flutter development are supported through dedicated extensions, and Flutter’s own VS Code page confirms that these extensions enable compiling, debugging, and deploying Flutter apps directly from the editor.
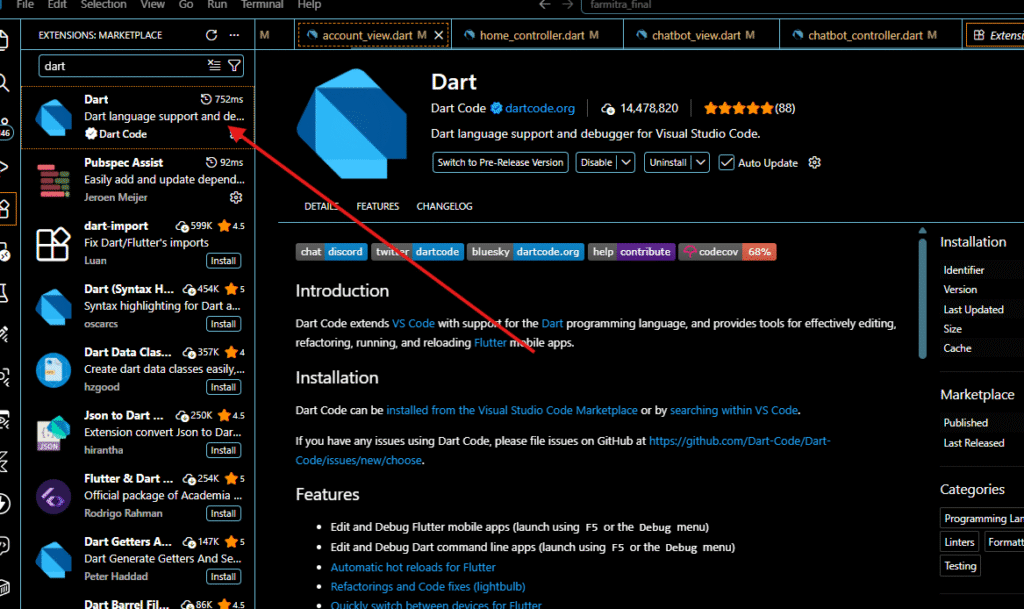
Once installed, restart VS Code.
A good sign that everything is correct is that the command palette starts recognizing Flutter commands.
Step 6: Verify Flutter commands inside VS Code
Open the command palette in VS Code with:
Ctrl + Shift + P
Then type:
Flutter:
Flutter’s official “Create a new Flutter app” documentation says that VS Code should surface Flutter commands from the Flutter plugin, including Flutter: New Project. If those commands are visible, VS Code is properly connected to Flutter.
If Flutter commands do not appear, the most common causes are:
- Flutter SDK not added to PATH
- Flutter extension not installed correctly
- VS Code not restarted after extension install
- terminal session still using old environment variables
Read : Common Errors After Installing Flutter SDK and How to Fix Them
Step 7: Run Flutter Doctor
Now verify the complete environment:
flutter doctor
This is one of the most important setup commands because it shows which parts of your development environment are complete and which still need attention. Flutter’s installation flow uses doctor-based verification across the setup process.
You may see checks for:
- Flutter SDK
- connected devices
- Chrome
- Android toolchain
- Visual Studio for Windows desktop development
- Xcode on macOS
- other platform-specific components
Do not panic if every category is not green. The exact requirements depend on what platform you want to build for.
Read : Flutter Doctor command — What is flutter doctor (2026 Complete Guide)
Step 8: Install platform-specific dependencies
Flutter supports multiple platforms, but your next steps depend on your target.
Android setup
If you want to build Android apps, install Android Studio or at least the required Android SDK components. Flutter doctor will tell you if Android licenses or toolchain pieces are missing. Flutter’s install flow also directs users into target-specific setup paths once the SDK and editor are installed.
Web setup
If Chrome is available, Flutter can target the web. Flutter doctor usually detects Chrome automatically when installed.
Windows desktop setup
If you want to build Windows desktop apps, Flutter’s Windows setup page states that Visual Studio with the Desktop development with C++ workload is required. That requirement is separate from Visual Studio Code. Many beginners confuse these two tools, but VS Code is the editor while Visual Studio provides the native Windows build tooling.
This distinction is very important:
- VS Code is enough to edit Flutter code
- Visual Studio is required only if you want to compile Windows desktop apps
Step 9: Create your first Flutter project in VS Code
Once Flutter commands are visible, create a new project from VS Code.
Open the command palette and choose:
Flutter: New Project
Flutter’s official project creation guide says VS Code will then prompt you to choose a template. For a standard app, choose Application. After that, select a folder and enter the project name.
A clean naming pattern is:
my_first_flutter_app
Avoid spaces and unusual characters in the project name.
Read: How to Build Your First App with Flutter: Beginner-Friendly Step-by-Step Tutorial
Step 10: Open the project and run it
Once the project is generated, open the main folder in VS Code. Start an emulator, connect a physical device, or choose Chrome for web testing. Then run:
flutter run
or use the Run and Debug options in VS Code.
Flutter’s quick-start and project creation flow both center around creating a sample app and then testing hot reload and debugging from the editor.
If the default counter app launches, your installation is complete.
Recommended VS Code settings for Flutter developers
After the basic setup works, spend a few minutes improving the editor experience. VS Code supports both user settings and workspace settings, so you can choose whether these changes apply globally or only to Flutter projects.
A practical Flutter-friendly setup includes:
- format on save
- Dart line length preferences
- auto-save only if you like it
- visible rulers for readability
- consistent indentation
Example settings.json snippet:
{
  "editor.formatOnSave": true,
  "dart.lineLength": 100,
  "editor.rulers": [100],
  "files.autoSave": "off"
}
These settings are not mandatory, but they make day-to-day Flutter coding much cleaner.
Common Flutter installation mistakes beginners make
A lot of installation issues come from a few repeated mistakes.
Installing Flutter inside a restricted system path
Flutter’s manual guide recommends a user-owned directory like %USERPROFILE%\develop rather than protected folders. If Flutter is stored in a location that requires elevated privileges, updates and commands can become messy.
Forgetting to restart the terminal after PATH changes
If you add Flutter to PATH and the terminal still says flutter is not recognized, the terminal is often using an old session.
Installing only the Flutter extension but not Dart
The Flutter extension usually works alongside Dart support, and the overall development experience is much smoother when both are installed.
Expecting VS Code alone to build Windows desktop apps
Flutter’s Windows setup explicitly requires Visual Studio with the C++ desktop workload for native Windows builds. VS Code alone is not enough for that target.
Skipping flutter doctor
If you never run flutter doctor, you miss the easiest way to detect missing Android licenses, SDK components, or platform dependencies.
How to update Flutter later
Once your installation is stable, you can keep Flutter updated using standard Flutter tooling. If you are following the normal stable-channel setup, use Flutter’s own update commands rather than randomly replacing files by hand. Flutter’s installation docs and SDK-based workflow assume command-line SDK management after setup.
A typical check looks like:
flutter --version
flutter doctor
For professionals managing multiple SDK versions, manual SDK control becomes more useful, which is another reason not to hide the installation path from yourself early in your learning journey.
Read : How to Update Flutter SDK (Step by Step Guide for Developers)
Troubleshooting checklist when Flutter is not detected in VS Code
If VS Code does not recognize Flutter even after installation, go through this order:
First, run:
flutter --version
If this fails, your PATH or SDK extraction is the problem.
Second, verify the extensions are installed:
- Flutter
- Dart
Third, restart VS Code.
Fourth, open the command palette and search for:
Flutter:
If commands still do not appear, reinstall the Flutter extension and reopen the editor.
Fifth, run:
flutter doctor -v
This gives a more detailed view of what is missing.
Read : How do I launch the Android emulator from the command line in 2026?
Best folder structure for long-term Flutter development
A clean folder structure makes future work easier. A professional Windows arrangement can look like this:
C:\Users\YourName\
  develop\
    flutter\
    projects\
      flutter_apps\
        my_first_flutter_app\
This keeps:
- the SDK separate from projects
- updates safer
- backups cleaner
- version-management migration easier later
Flutter’s own manual guidance to keep the SDK in a clean dedicated directory strongly supports this kind of structure.
Final thoughts
A proper Flutter installation is not just about making flutter run work once. It is about setting up a development environment that stays reliable when you create more apps, add Android tooling, target web, or later publish builds. If you install Git, place the Flutter SDK in a clean path, configure PATH correctly, install Flutter and Dart extensions in VS Code, and verify everything with flutter doctor, you will avoid most beginner setup errors before they even happen.
Setting up Flutter in VS Code works best when the complete environment is ready, including the Flutter SDK, Dart support, Git installation, system PATH configuration, and a verified setup through flutter doctor. Many developers install the Flutter and Dart extensions in VS Code but later face issues because the SDK path is wrong, Android tools are incomplete, or the base Flutter installation on Windows was not configured correctly. To make your VS Code setup smooth and reliable, also check our detailed guides on downloading Flutter SDK, installing Flutter on Windows, fixing Flutter installation errors, and running the Flutter doctor command step by step.
FAQ: Flutter Installation and SDK Setup Problems
Usually this happens when the Flutter SDK bin folder is not added to PATH correctly, or the terminal was not restarted after updating environment variables. Recheck the SDK path and open a new terminal window.
This usually means the Flutter extension is not installed properly, or VS Code cannot detect the Flutter SDK. Install both Flutter and Dart extensions, then restart VS Code.
flutter doctor show Android toolchain issues? This happens when Android SDK components, platform tools, or licenses are missing. Install Android Studio or required SDK tools, then run the Android license acceptance command.
VS Code may fail to detect the SDK if Flutter is extracted in the wrong location or PATH is not updated. Keep the SDK in a clean folder like C:\src\flutter or inside your user development directory.
flutter doctor still showing errors after installation? Not every error means Flutter is broken. Some warnings are platform-specific, such as Windows desktop or iOS setup, and only matter if you plan to build for those platforms.
The emulator may not be started, detected, or configured correctly. Open the emulator first, confirm it appears in the device list, and then run the app.
The first run often downloads additional artifacts, dependencies, and platform files. This is normal, but later runs usually become much faster.
This often happens when VS Code was opened before PATH changes were applied. Close VS Code completely and reopen it after confirming flutter --version works in terminal.
Start Android emulator or connect a physical device via USB and enable debugging.
Follow flutter doctor suggestions and ensure all required dependencies are installed.